How To Make Your Own Roblox Shirt with the Roblox Shirt Template
How do you make a Roblox shirt? Truth be told, it isn’t too complicated – all you need is a Roblox shirt template and you’ll be on your way to becoming a style icon. We can’t promise that your creations will make it to the runways of Paris and Milan, but we can guarantee that our guide on how to make a Roblox shirt will walk you through the process from start to finish.
Let’s start with the basics. There are a few different options if you want to create your own clothing in Roblox, and the most simple is the humble t-shirt. All you need to do is create a simple image (or a decal, as you might see it referred to in-game) and upload it to Roblox. Hey presto, your avatar can now strut their stuff with a custom t-shirt.
But if you’ve got a passion for fashion, custom Roblox shirts and Roblox pants are the way to go – and this is where the Roblox shirt template and Roblox pants template come in.
Our guide below will walk you through the process of creating, saving, and uploading your shirt designs for use in-game, but it’s worth noting that your creations will need to be approved by a moderator before you can use them. If you’re twiddling your thumbs while you wait, be sure to check out RobloxID’s vast catalog of Roblox hair IDs, Roblox face IDs, and Roblox hat codes to ensure your entire outfit is on point.
And once you’re happy with your avatar’s style, you’ll undoubtedly want to show off your new gear in the biggest and best Roblox games. Be sure to check our game pages for free items and boosts in the best Roblox games, such as Blox Fruits codes, Pet Simulator X codes, and RoCitizens codes.
How Do I Make A Roblox Shirt?
Read on for a full guide on how to make a Roblox shirt using a Roblox shirt template. If you’re in a hurry, though, here’s the quick version.
- Save the Roblox shirt template.
- Open the template in your favorite image editing software.
- Add whatever colors, patterns, and designs you like.
- Save the file. Make sure it’s still 585 pixels wide by 559 pixels tall.
- Upload your file to Roblox. After a short moderation process, your shirt will be available to use in-game.
Looking for a bit more detail? We’ve got you covered. First things first – you’ll need to download the Roblox shirt template below. Right click on the image and select ‘save image as’ in order to get your hands on that all-important shirt template.
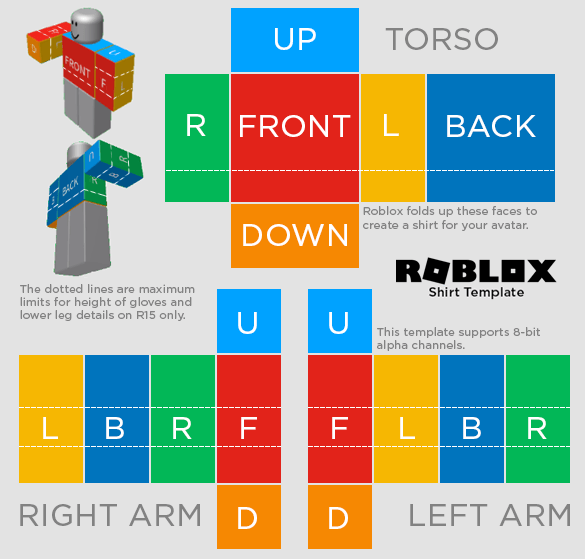
Got it? The first thing you’ll notice about this shirt template is that it doesn’t look very much like a shirt. That’s because the shape has been flattened. The labels on the template (eg front, back, right arm, left arm) will help you get a sense for how the shirt will look when it’s folded up and wrapped around your avatar’s torso.
Once you have your shirt template, it’s simply a matter of opening it in whatever image editing software takes your fancy. Paint is one option, but there’s a whole wealth of software out there – just use whichever one you’re most comfortable with.
Now that you have the template open, it’s over to you. Let your creativity run wild with whatever colors, patterns, and designs you like the look of. The sky really is the limit, though you should take care not to resize the template – it has to be the right size (585 pixels wide and 559 pixels tall) in order for the upload process to work.
Once you’ve finished your design, it’s time to save it and upload it to Roblox. If you’re not sure where to upload your finished design, check the My Creations tab. Look closely and you’ll see separate sections for uploading t-shirts, shirts, and pants.
Once it’s uploaded, you can expect a short wait while your design is moderated, but once it’s approved it’ll be ready to apply to your avatar right away. Congrats – you’ve just made your own Roblox shirt!
How Do I Make Roblox Pants?
Read on for a full guide on how to make Roblox pants using a Roblox pants template. If you’re in a hurry, though, here’s the quick version.
- Save the Roblox pants template.
- Open the template in your image editing software.
- Add whatever colors, patterns, and designs you like.
- Save the file. Make sure you don’t change the image dimensions.
- Upload your file to Roblox. After a short moderation process, your shirt will be available to use in-game.
So that’s the short version, but read on if you’re looking for a more detailed Roblox pants guide.
Making Roblox pants is a lot like making Roblox shirts – the template you start with is the only major difference. This time you’ll want the Roblox pants template. Once again, you can right click the image below and select ‘save image as’ to get started.
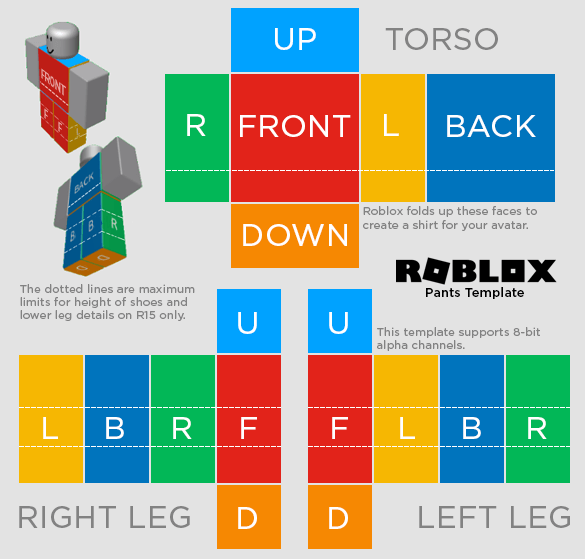
Once again, you’ll notice that the template doesn’t look much like the finished article, but that’s okay. As part of the upload process, the template will be folded up around your avatar’s lower body, turning those flat colours into a three-dimensional wearable.
Fire up your image editing software of choice and open the template. At this point, it’s up to you and your imagination to bring your dream-pants to life. It’s worth noting that, as well as designing stylish slacks and trendsetting trousers, you can also use this template to create custom shoes – pay careful attention to the orange boxes labelled ‘D’ on the template.
Once you’re happy with your handiwork, it’s time to save your image and upload it to Roblox. If you’re not sure where to upload your finished design, check the My Creations tab. Look closely and you’ll see separate sections for uploading t-shirts, shirts, and pants.
At this point, you may have to wait a short while for the asset to be approved. Once you get the thumbs up, though, you’ll be able to slip into your new pants right away.
Roblox Shirt Template Transparent Version
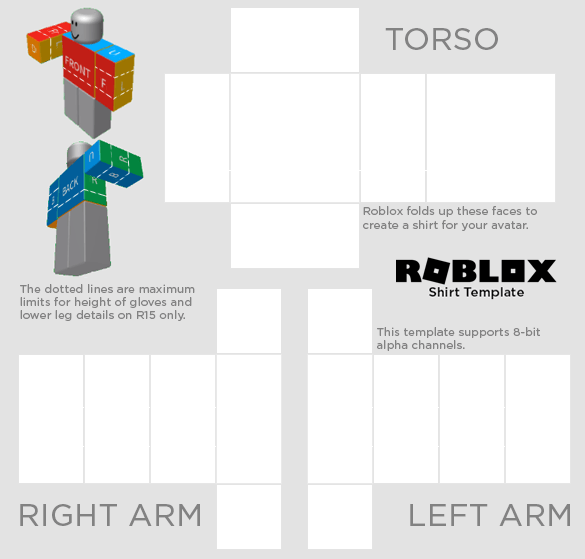
The templates are above are perfect for most clothing, but what if you want to create clothing that doesn’t cover the whole of your avatar’s body? That’s where the Roblox shirt template transparent version comes in, allowing you to create mesh tops, crop tops, string vests, or any other clothing you can imagine.
Here’s how to use the Roblox shirt template transparent version:
- Save the Roblox shirt template transparent version.
- Open the template in your preferred image editing software.
- Add colors, patterns, or designs as you see fit. Remember that any sections you leave blank will be transparent on your finished shirt.
- Save the file as a PNG, taking care to preserve the transparency. Make sure it’s still 585 pixels wide by 559 pixels tall.
- Upload your file to Roblox. After a short moderation process, your new shirt will be available to use in-game.
Making a shirt that uses transparent elements is a bit more difficult than creating a standard item of Roblox clothing, but if you take your time and follow the instructions carefully, you should be just fine.
So there you have it – everything you need to go from total schlub to budding fashionista. Remember to complete the look with the latest Roblox face ID codes, a handsome Roblox face accessory ID code, and a chic Roblox back accessory ID code to boot. You’ve earned it.